Um, Yuck!

rumpledimagesI’m not sure about you, but now that I am a grown up, I really appreciate crawling into clean, fresh-smelling sheets.  When I was young, my mom used to threaten us with the teenage horror of getting acne if we kept going to bed without showering and not washing our sheets weekly.  It didn’t always result in us getting them to the hamper every week, but at least I remember her threat.  Hmmm

I have heard the nightly news headlines about how gross hotel bedding can be, but never really thought much about it in terms of my own bedding because I assumed the problems that happen in hotels had a lot more to do with the large number of people staying there than anything else.  From what I’ve been learning, apparently I was very, very wrong.

sweatWhen we sleep most of us sweat, I know I do!  Think about the kinds of things that we leave behind on our sheets & pillow cases when we’ve been sweating, tossing and turning all night:

  • hair, skin cells, body oil, saliva, bodily fluids (if you aren’t wearing any clothing), lotions, deodorants, perfumes, hairspray, makeup, dirt, anything chemical you might have encountered during the day (especially if you didn’t shower before bed), etc.
  • pets in/on your bed are leaving behind much of the same plus traces of fecal matter (their own plus that of any other animals their faces, paws, and coats picked up from sidewalks, grass and other places they were during the day), urine, fur, dander, pollen, etc.  Hmmm

A very unscientific poll was conducted by a Colorado radio personality, just in his office, and his results were about what I’d expect to find if I conducted the same poll among a random group of people.  He shared that, ” It was funny to see their reactions as they looked at me and said, after giving me their answer, is that bad?  I found it funny how many people had similar looks on their faces and how one, who will remain unnamed, really had to think about the chore and when the last time it was done.”  For the record, I wash mine once a week.

bed_sheets_chart-630x424

Things that might cause me to wash them more frequently:

  • I am having frequent overnight visitors and my guest room is getting a lot of use;
  • A visiting child spills juice or some other icky stuff on the comforter;
  • Said visiting child has an unfortunate accident on the bed;
  • A pet (or 3) sleeping with us, comes in from the outside with muddy paws;
  • One of said pets has an unfortunate accident (grr!) on the bed;
  • It’s shedding season and I can’t keep up with the daily fur attack;
  • One or both of us has been sick, feverish and/or sweating at night;
  • Close your ears and eyes boys, “Aunt Flo” comes calling in the middle of the night; or
  • Action starts heating up more frequently in the bedroom. 😉

Otherwise, I generally stick to a weekly machine washing of the sheets, blanket & comforter, but, because I allow my labs and cat on the bed, I also maintain a pretty strict daily routine of:

  • Shaking and thoroughly pounding together of the decorative bed pillows, then using my Shark Pet Perfect II to suck out as much dust as possible;
  • Vacuuming the fitted and top sheets (I recommend the Shark Rocket Deluxe Pro);
  • Shaking off the comforter;
  • Brushing the comforter (The Evriholder Fur Remover is a GODSEND!) to remove as much remaining dog & cat hair, dander & dust as I can before also giving it a quick vacuum;
  • After all of that is done, and the bed has been remade, I then sweep the hardwood floors of the bedroom where I can reach, and run our Roomba at least once before mopping our hardwood floors to grab anything I might have missed.

Doing all of that generally keeps the fur, dust, and dander under control in our bedroom, as well as the rest of the house, and helps to keep my allergies and asthma from flaring up.  Speaking of “Dander,” did you know that dander is the primary food source for dust mites?  Oh wait, we haven’t talked about dust mites yet, have we?

Here’s a quick Dust Mite Primer:

  • House dust mites are microscopic bugs (Not Bed Bugs) that live primarily on dead skin cells that regularly shed from people and household pets;
  • Dust mites are generally harmless to most people;
  • Dust mites don’t carry diseases, but they can cause allergic reactions in asthmatics and others who are allergic to their feces;  Um yeah, their poop.  When they eat our cast off skin they naturally poop it out, and that gets left behind in your sheets, on your pillow cases, on decorative throw pillows, blankets, and anything else that gathers fur, hair, dust and other environmental cast off in your house.  DISGUSTING!

In addition to dust mites, www.diply.com highlighted a couple of other gross things that can gather on your pillowcases if you don’t wash them frequently:

  1. Mold:  Most household pillows contain mold spores.  Mold exposure can cause a potentially fatal lung infection called chronic pulmonary aspergillosis;
  2. Bacteria:  Bacteria on your pillowcase can result from leaving it unwashed and can lead to…yep, ACNE!

The best way to avoid mold, bacteria and dust mites on your bed linens is to avoid spikes in humidity.  If you keep your room cool you will reduce the likelihood that you will sweat while you are sleeping.  Wash your face (and your entire body when you can) before you go to bed, to remove the bacteria and dead skin from your face and lessen the chances that you’ll be sleeping in the day’s accumulation of environmental contaminants, microscopic bacteria, along with a big build up of sloughed off skin cells, vacuum your mattress when you change your sheets every week, invest in good zippered pillow protectors to keep dust mites, mold and bacteria from getting into your pillows, and keep your room as dust free as possible by sweeping, vacuuming and dusting your bedroom every day or two.

Are you on Facebook?  If you are interested in blog follow ups, free or discounted stuff I find, things that make me wonder, scream like a maniac, laugh, or yell in frustration, join the nearly 2,700 people who find me engaging or amusing at the page dedicated to this blog: https://www.facebook.com/extremeblondemoments

Build an Elliptical Desktop in 30 Minutes

xcx_1050I moved my elliptical machine into my guest room/office this week to make room for the new rowing machine I just “had to have” but had no room for in the workout portion of the garage.  I had the space available and, after adding some component shelves to the walls beneath and beside the “extra” TV I gained this week when my husband insisted the spare bedroom needed a 40″ high def TV, (Don’t get me started, at least it was a daily deal on Amazon) it might spur me to get off my ever expanding backside more during the day.

The only rub was that I have always disliked the magazine/iPad tray on this Nordictrack CX 1050 Elliptical that caused heat to build up on the touch screen beneath.  So, lightbulb! I’d get a desk to stretch between the stationary arms so I could use my new favorite tech toy: Logitech k480 3 device Bluetooth wireless keyboard to use my laptop via the nifty screen mirroring app that came on the Sony DVD player that I attached to the old TV so, when I wasn’t striding and working on my blogs, I’d be able to watch videos & Netflix, etc. while spending hours on the elliptical.  Let’s not all fall out of our chairs at the same time laughing hysterically.  Hmmm

ellipticaldeskOf course, the desktop I ordered came nowhere close to working.  Undeterred, I gathered up scrap wood from some of my other “projects of desperation,” as I call the things I build when I can’t find what I need to suit my purpose, and set about making a desk that would work for me.  The best news for anyone who doesn’t have power tools, or isn’t comfortable using them, is you can go to Home Depot (or Lowe’s) and they’ll cut your wood for free and the whole thing can be assembled with wood glue if you don’t want to use screws.

Parts:

  • 1 Piece 24″ x 12″ wood sanded  (I glued & clamped 2 scrap pieces together)
  • 1 Piece 1″ x 2″ x 26″ wood sanded
  • 1 Piece 1″ x 2″ x 30″ wood sanded
  • 1 Piece 1″ x 8″ x 24″ wood sanded
  • 1 Piece 1″ x 2″ x 12″ wood sanded
  • Wood Glue
  • Clamps

Assembly Instructions:

  1. Lay the piece of 1″ x 2″ x 30″ wood (on it’s 2″ wide side) on your work surface.  Measure 15″ across and mark the enter point of your wood.  This is the cross member that will lie underneath the desk across the widest part of the stationary side arms of your machine.  The portion of the arms that are furthest away from the computer / screen of the machine.
  2. Measure 6″ away and lay down your 1″ x 2″ x 26″ piece of wood (sitting up tall on it’s 1″ skinny side) to begin to form the slope for a better viewing and working angle – this is where you will see the piece of leftover closet rod I used.  Measure 13″ across and mark the center point of your wood.  This piece is the piece of wood that will be sandwiched between the two pieces of wood that create the angle of the desk that will be closest to the front of your elliptical machine’s moving handles.  My machine handles move in a very compact movement, so these measurements work for my model (shown above).  You may need to adjust the measurements at this point to make sure that your arms have enough room to move once the desktop is glued down in step 4.
  3. Apply a line of wood glue to both of these pieces of wood on the portions facing up toward the ceiling.  I use Gorilla Wood Glue.  It dries in about 30 minutes and holds tight.
  4. Mark the center point of the piece of 24″ x 12″ wood at the top and bottom and connect the points with a solid line on the side that will be underneath (facing the floor and glued to the cross members).  Mark a point down from the top at 7″ at both ends and in the middle and draw a line connecting the marks and crossing the middle line.
  5. Lay the piece of 24″ x 12″ wood with the line side facing you, then lay the top cross member (1″ x 2″ x 26″) glue side down, matching the center point you marked at 13″ with the center line on the desktop underside, and make sure the cross member is in perfect alignment with the edge along the top.  Clamp the cross member to the top firmly.
  6. Match the center mark on the 30″cross member with the intersection point on the lines you drew on the underside of the top, line the top edge of the cross member up with the line all the way across, then firmly press the glued side down, clamping at the ends. There will be an excess 6″ that is not attached to anything beyond the 30″ cross member.
  7. With the bottom of the desktop still facing up, make sure that you can see the center point marking at 13″ then mark a point 2″ in from each end of the top cross member.
  8. On the bottom cross member make sure the center point is clearly marked at 15″ then mark a point 3″ in from each end.
  9. Remove the clamps and run a line of glue across both cross members between the marks you made.  Do not run the glue all the way to the ends.
  10. Take the piece of 1″ x 8″ x 24″ wood and mark the top and bottom edges at 12″ (the midpoint width-wise).  Line up with the center points you marked on the cross members and press the 1″ x 8″ x 24″ firmly in place.  Open the clamps up a bit and re-clamp the sandwiched cross members in place.  Allow the glue to dry for 30 minutes.
  11. Turn the desk over and allow the clamped ends to overhang your work surface (I put it in place on the elliptical so I could finish the last step while it dried).elldesk1
  12. Make sure you can clearly see the marked center point at the bottom of the desktop.  Take the remaining piece of 1″ x 2″ x 12″ wood, mark the center point at 6″ about 3/8″ up from the bottom of the wood when stood up on it’s end.
  13. Run a line of glue along the edge of the desktop facing you 6″ out each way from the center point.  Spread it with your finger so it won’t drip while you are placing the 1″ x 2″ x 12″ with the edges aligned at the bottom so that the 1″ x 2″ stands above as a lip or edge that guards against your keyboard, iPad, Book or Magazine slipping off while you are striding.  You can secure it with a expandable clamp, or strap clamp meant to stretch for this purpose, or do like I did and, using 1 1/2″ trim screws and my power screwdriver, sink a couple of screws in from the front and fill with wood filler to hide the holes.

TIPS: 

  • I used 2 1/2″ wood screws driven up from the bottom through the closet rod because the round surface against the two flats didn’t adhere as well with the glue.
  • I used 1 1/4″ trim screws from underneath to secure the 30″ cross member to the desktop so that everything was extra secure.

Yours will be more “finished” looking than mine because I was utilizing scraps and you’ll be cutting to exact measurements with new pretty wood.

Are you on Facebook?  If you are interested in blog follow ups, free or discounted stuff I find, things that make me wonder, scream like a maniac, laugh or yell in frustration, join the more than 2,600 people who find me engaging or amusing at the page dedicated to this blog: https://www.facebook.com/extremeblondemoments

Product Review: Ped Egg Powerball

pedicure
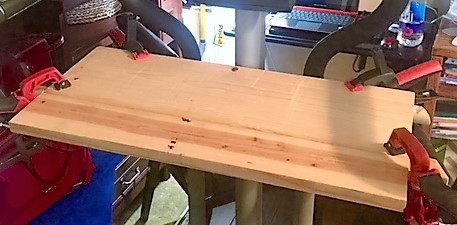
I spend $75 every two weeks getting a gel fill on my fingers and a “Spa” pedicure.  Somehow, despite that unreasonably high charge, the calluses on my feet never seem to get dealt with (even when I pay the extra for “callus removal”) nor do they become any softer.  It’s frustrating to say the least.

pedegg-powerball-pivoting-callus-remover-set-d-20151204094858647~455041_100Yesterday, while sneaking off to Rite Aid to get a scoop of Thrifty Ice Cream, I walked the aisles to kill some time and ended up in front of the “As seen on TV” display.  I saw the usual unexciting things and then did a double take when I saw a product that I hadn’t seen before:  Ped Egg Powerball.  With a swiveling head and ability to be recharged (instead of running on expensive batteries), it looked interesting enough that I spent the $19.99 and left with one to give it a try.

The box instructions left a bit to be desired, so I headed to the internet to see if there was anything I needed to know, like, could I use it in the bath tub?

The first thing I noticed about the website was that I seemed to have gotten a good price.  The website advertised it at $29.99.  I didn’t get the 3 replacement rollers or the fancy organza carrying bag though, so the $10 was likely a wash.  The website also promised me:

  • Beautiful younger looking, baby smooth feet
  • Easily buffed away calluses, dead skin, or dry and rough skin in seconds
  • A painless, blade free experience
  • Can be used on “Men’s callused hands” as well

What http://www.asseenontv.com did not give me was the ability to buy the add-ons, any instructions or warnings.  Hmmm

I did a google search and found other sites selling the Ped Egg Powerball, but found the same lack of additional information and also some alarmingly low ratings – averaging 1 star.

According to Sue K, who bought it 2 months ago at Bed, Bath & Beyond, (who at least will take it back no questions asked)  it doesn’t work, stops running at the least application of pressure, and she could do a better job with a loofa.  UG!

Finally I came across the official website, but again, not a lot of useful information.

  • There was an accessories section, but no ability to buy replacement rollers
  • The F.A.Q. section only answered shipping/ordering questions
  • The Testimonials section had zero reviews…

Since I had struck out in my search for warnings and instructions, I forged ahead and just assumed that I can’t use it in water and that, after reading Consumer Reports and other reviewers, I should expect it to be slower/less powerful than advertised.

45 Minutes later and I’m not impressed.  First I stood at the counter with my left foot, which has a thicker callus on the heel and big toe than my right, and tried the Ped Egg Powerball (with a full charge) dry.

  • If I pushed with any pressure at all the roll came to a stop
  • To the promises of:  Easily Buffed Away Dry Skin, Dead Skin & Calluses in Seconds – NOPE nothing fast or easy about the process;  Painless Experience – Yes, it barely registered as more than a tickle;

Because I seemed to be getting nowhere fast, and I had a hot bath with dead sea salts waiting for me, I decided to have a good long soak and attack it again after my skin was softened up.  I soaked for 30 minutes, shaved with coconut oil (which also then ended up in my bath, then dried off and immediately gave the Ped Egg Powerball another shot.  I still ran into the same pressure issue, but it seemed to do a much better job after the hot bath, salts and oil to soften the work areas up.  I did notice that the roller seemed to gum up pretty quickly and that makes me feel like they would need to be replaced fairly often with regular use…HMMM

Final opinion:  It’s not the worst $19.99 I’ve ever spent, but I have a hard time spending an additional $15.99 plus shipping every time I need new rollers.  The only way I’ll be using it in the future is if I remember to charge it while I am taking a bath and feel like spending an extra 15 minutes doing what would take me 5 minutes in the tub with a pumice stone. It eventually does what it promises if you take the additional steps and time to help it work a little less hard, so I’d give the Ped Egg Powerball only 2 stars out of 5 for performance and only 1 out of 5 for a good value – considering the lack of replacement rollers included and the cost (+ difficulty) to acquire more.

Are you on Facebook?  If you are interested in blog follow ups, things that make me wonder, laugh or scream in frustration, join the nearly 2,500 people who find me engaging or amusing: https://www.facebook.com/extremeblondemoments


Very Disappointed By My Fitbit Experience

fitbit-logo-300x109I have bought and used many different fitness trackers from the Polar watch linked chest strap heart rate monitor to the Nike+ shoe insert, Adidas Micoach no strap/in the sports bra heart rate monitor, Scosche Arm Band, iFit Chest Strap Monitor, Garmin Vivofit, and others I’m sure I’ve bought and forgotten.  But, even when I’ve strayed and tried the flavor of the month, I’ve been a loyal wearer of the Fitbit from it’s first clip on to the latest Charge HR.

That said, I am quite disappointed that, as much as the Fitbit step monitoring product has “advanced” with each version, it has actually fallen behind the competition and I am strongly considering a change:

  • The clip-ons (Zip, Ultra, and One) had a tendency to unclip and disappear mid-workout
  • The Flex bands would come unsnapped during workouts, were brittle and cracked/broke, and worst of all, were apparently very yummy as my dogs chewed up 4 of them…hmmm
  • As soon as it became available, I bought a Fitbit Aria Scale.  Then I started noticing that I didn’t like having my weight broadcast to my Fitbit app and visible to my friends, “How Rude!”  Apparently there’s a setting to stop that, but my shame was complete, so Aria and I ended our brief & rocky relationship!
  • I loved the Force, which was on backorder forever then pulled off the market abruptly a short time later.  The Force was waterproof – I could finally track “steps” while swimming! But the Force also had a tendency to emit a gentle yet stingy pulse every once in a while that left a mark.  No Bueno indeed!  So I returned to one of my Flex models from the drawer of obsolete trackers.
  • With great excitement I saw the announcement for the Fitbit Charge and Charge HR that would be coming out in time for me to ask my husband to get me one for my Christmastime birthday.  He got on the waiting list at the local sporting goods store and we waited patiently for the arrival.  Finally the Charge became available so we snapped two of them up, anxious to see what all the hype was about.  Besides being a bit bigger and having a new secure wrist strap, the Charge was just a more expensive version of the Flex, but happily we wore it while I secretly pined for the arrival of the be-all-to-end-all.
  • The Charge HR! I don’t rely on steps alone to determine how my “Fit Day” has gone, I love the addition of a heart rate monitor that requires no chest strap and can count additional calories burned based on my actual 24 hour heart rate readings!  That’s the good, now here’s the bad of the Charge HR that I immediately replaced my Charge with once it became widely available in May of this year.  1) The plastic housing for the stat screen cracked in the first 2 months of normal wear, causing me to have to contact the company for a replacement 2) It is NOT waterproof, in fact it’s barely water resistant.  I had it on while standing in shallow water and got splashed.  When I touched the Charge HR to remove it to a dry place, I got a painful shock!  and 3) The battery life blows!  I have to charge it every 36-48 hours.  That is neither convenient nor does it allow me to get a whole day+ sleep picture.  Charging it during my 5 minute (CA drought/water use imposed) shower just doesn’t cut it.  I am in motion most of my day and have very few opportunities to take it off and charge it.  That is not what this Fit Girl envisioned at all!
  • They do have the Surge: A giant men’s watch-sized version that has a screen large enough to display all stats at once, but that doesn’t interest me at all.

I have to say that my Garmin Vivofit has the most features that meet my needs:

  • It was less expensive than the closest Fitbit product with similar features
  • It has a battery that is guaranteed to last at least 1 year – no taking off to charge – big advantage
  • It can be worn 24/7 because it is truly water resistant.  During the many times I had to have my One, Flex, and Charge replaced due to loss or damage, I have worn mine in the shower, the pool and when very sweaty during workouts and never had an issue.  It’s kind of like the old Timex saying, “It takes a licking and keeps on ticking!”
  • It reminds you to stay active with move bar and audible alert
  • It learns your activity level and proposes a personalized daily goal
  • It shows steps, calories, distance and time of day on backlit display; monitors sleep
  • It doesn’t track how many flights of stairs I walk and give me fancy little achievement awards, but I can add the stairs as an activity and monitor them that way
  • It also won’t sync up to let me participate in Fitbit challenges, but I never win anyway (LMAO) so I can live without that “feature” too
  • It automatically syncs to Garmin Connect™ to save, plan and share progress
  • It does have heart rate tracking with the optional heart rate strap.  That it needs a strap to monitor heart rate is the only negative to me on this one.  If it had strapless heart rate monitoring I would have given up on my Fitbit long ago
  • Another negative to the Garmin Vivofit is that some Apps say they make it compatible to share with the Fitbit App for competing with your friends.  I have had great difficulty getting that to be a reality

all_color_garmin_vivofit-1024x501After all of the time, money and effort I’ve invested in Fitbit, I have come to the realize that I am better off going back to the Garmin Vivofit to monitor my fitness goals.  A very expensive lesson indeed.  Hmmm

If you are on Facebook and are interested in the things I may not devote an entire blog post to, but that make me wonder, piss me off, funny quips, photos and other things, I have a page followed by more than 2,000 people who find me engaging and/or mildly amusing:  https://www.facebook.com/extremeblondemoments