 I moved my elliptical machine into my guest room/office this week to make room for the new rowing machine I just “had to have” but had no room for in the workout portion of the garage. I had the space available and, after adding some component shelves to the walls beneath and beside the “extra” TV I gained this week when my husband insisted the spare bedroom needed a 40″ high def TV, (Don’t get me started, at least it was a daily deal on Amazon) it might spur me to get off my ever expanding backside more during the day.
The only rub was that I have always disliked the magazine/iPad tray on this Nordictrack CX 1050 Elliptical that caused heat to build up on the touch screen beneath. So, lightbulb! I’d get a desk to stretch between the stationary arms so I could use my new favorite tech toy: Logitech k480 3 device Bluetooth wireless keyboard to use my laptop via the nifty screen mirroring app that came on the Sony DVD player that I attached to the old TV so, when I wasn’t striding and working on my blogs, I’d be able to watch videos & Netflix, etc. while spending hours on the elliptical. Let’s not all fall out of our chairs at the same time laughing hysterically. Hmmm
 Of course, the desktop I ordered came nowhere close to working. Undeterred, I gathered up scrap wood from some of my other “projects of desperation,” as I call the things I build when I can’t find what I need to suit my purpose, and set about making a desk that would work for me. The best news for anyone who doesn’t have power tools, or isn’t comfortable using them, is you can go to Home Depot (or Lowe’s) and they’ll cut your wood for free and the whole thing can be assembled with wood glue if you don’t want to use screws.
Parts:
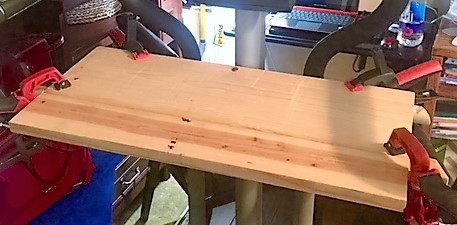
- 1 Piece 24″ x 12″ wood sanded (I glued & clamped 2 scrap pieces together)
- 1 Piece 1″ x 2″ x 26″ wood sanded
- 1 Piece 1″ x 2″ x 30″ wood sanded
- 1 Piece 1″ x 8″ x 24″ wood sanded
- 1 Piece 1″ x 2″ x 12″ wood sanded
- Wood Glue
- Clamps
Assembly Instructions:
- Lay the piece of 1″ x 2″ x 30″ wood (on it’s 2″ wide side) on your work surface. Measure 15″ across and mark the enter point of your wood. This is the cross member that will lie underneath the desk across the widest part of the stationary side arms of your machine. The portion of the arms that are furthest away from the computer / screen of the machine.
- Measure 6″ away and lay down your 1″ x 2″ x 26″ piece of wood (sitting up tall on it’s 1″ skinny side) to begin to form the slope for a better viewing and working angle – this is where you will see the piece of leftover closet rod I used. Measure 13″ across and mark the center point of your wood. This piece is the piece of wood that will be sandwiched between the two pieces of wood that create the angle of the desk that will be closest to the front of your elliptical machine’s moving handles. My machine handles move in a very compact movement, so these measurements work for my model (shown above). You may need to adjust the measurements at this point to make sure that your arms have enough room to move once the desktop is glued down in step 4.
- Apply a line of wood glue to both of these pieces of wood on the portions facing up toward the ceiling. I use Gorilla Wood Glue. It dries in about 30 minutes and holds tight.
- Mark the center point of the piece of 24″ x 12″ wood at the top and bottom and connect the points with a solid line on the side that will be underneath (facing the floor and glued to the cross members). Mark a point down from the top at 7″ at both ends and in the middle and draw a line connecting the marks and crossing the middle line.
- Lay the piece of 24″ x 12″ wood with the line side facing you, then lay the top cross member (1″ x 2″ x 26″) glue side down, matching the center point you marked at 13″ with the center line on the desktop underside, and make sure the cross member is in perfect alignment with the edge along the top. Clamp the cross member to the top firmly.
- Match the center mark on the 30″cross member with the intersection point on the lines you drew on the underside of the top, line the top edge of the cross member up with the line all the way across, then firmly press the glued side down, clamping at the ends. There will be an excess 6″ that is not attached to anything beyond the 30″ cross member.
- With the bottom of the desktop still facing up, make sure that you can see the center point marking at 13″ then mark a point 2″ in from each end of the top cross member.
- On the bottom cross member make sure the center point is clearly marked at 15″ then mark a point 3″ in from each end.
- Remove the clamps and run a line of glue across both cross members between the marks you made. Do not run the glue all the way to the ends.
- Take the piece of 1″ x 8″ x 24″ wood and mark the top and bottom edges at 12″ (the midpoint width-wise). Line up with the center points you marked on the cross members and press the 1″ x 8″ x 24″ firmly in place. Open the clamps up a bit and re-clamp the sandwiched cross members in place. Allow the glue to dry for 30 minutes.
- Turn the desk over and allow the clamped ends to overhang your work surface (I put it in place on the elliptical so I could finish the last step while it dried).
- Make sure you can clearly see the marked center point at the bottom of the desktop. Take the remaining piece of 1″ x 2″ x 12″ wood, mark the center point at 6″ about 3/8″ up from the bottom of the wood when stood up on it’s end.
- Run a line of glue along the edge of the desktop facing you 6″ out each way from the center point. Spread it with your finger so it won’t drip while you are placing the 1″ x 2″ x 12″ with the edges aligned at the bottom so that the 1″ x 2″ stands above as a lip or edge that guards against your keyboard, iPad, Book or Magazine slipping off while you are striding. You can secure it with a expandable clamp, or strap clamp meant to stretch for this purpose, or do like I did and, using 1 1/2″ trim screws and my power screwdriver, sink a couple of screws in from the front and fill with wood filler to hide the holes.
TIPS:
- I used 2 1/2″ wood screws driven up from the bottom through the closet rod because the round surface against the two flats didn’t adhere as well with the glue.
- I used 1 1/4″ trim screws from underneath to secure the 30″ cross member to the desktop so that everything was extra secure.
Yours will be more “finished” looking than mine because I was utilizing scraps and you’ll be cutting to exact measurements with new pretty wood.
Are you on Facebook? If you are interested in blog follow ups, free or discounted stuff I find, things that make me wonder, scream like a maniac, laugh or yell in frustration, join the more than 2,600 people who find me engaging or amusing at the page dedicated to this blog: https://www.facebook.com/extremeblondemoments